Home » Technology » Page 2

Category: Technology

More adventures in 3D printing

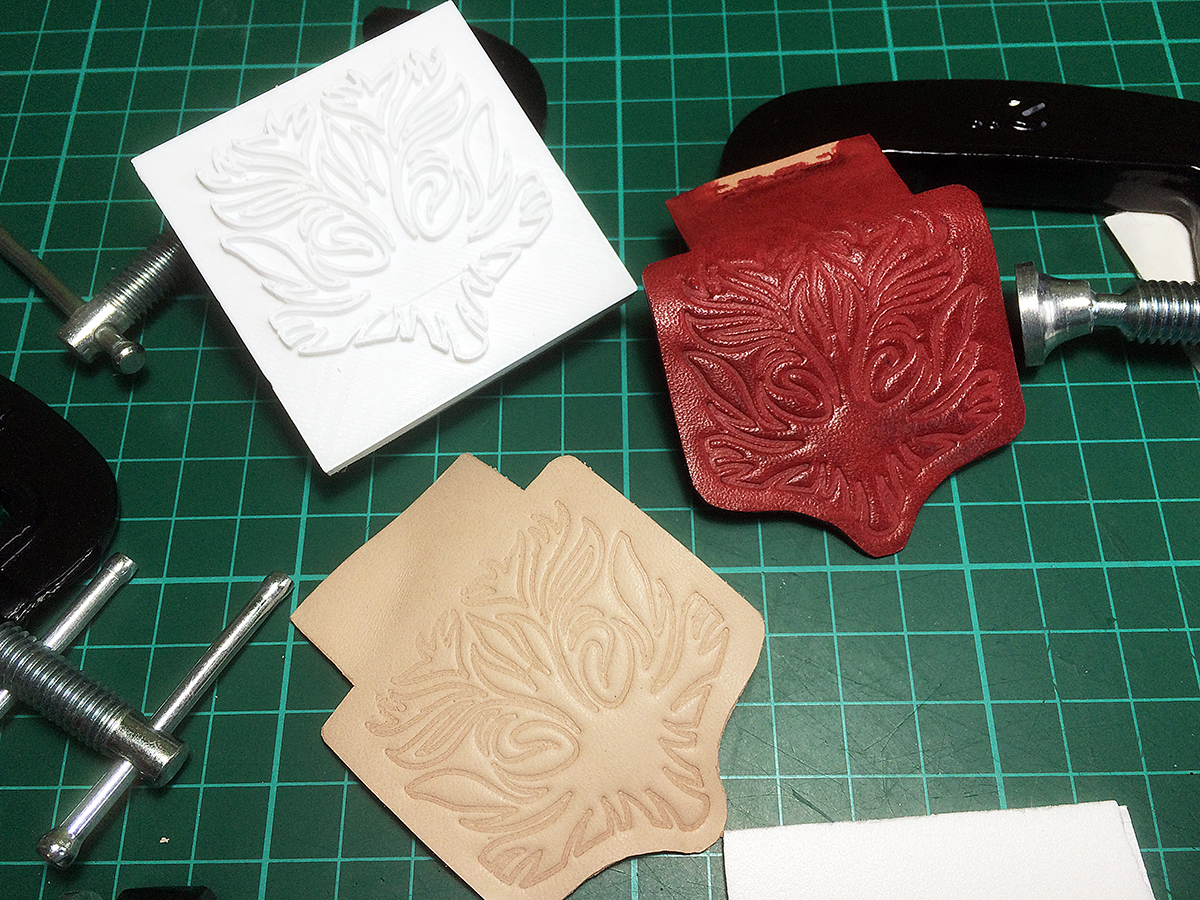
I did go on a leather carving course a couple months back, its a lovely thing to do, working with leather stamps is very satisfying. But it made me think about just how small the carving would need to be to look appropriate at 1/6 scale. So I decided to try another adventure in 3D – and I think it worked amazingly well.

Using my Adobe Illustrator software (again) and one of the handy patterns included I created a saddlebag flap illustration. Sounds easy? Not quite that easy, fiddly and involved some detailed adjustments. And after all that, on the advice of the printers, a little more fiddling! But the finished stamp has been working so well…

After lots of testing, (sourcing of g clamps) and generally trying out clamping and drying times etc, this is where I’m at. Because its worked so well I have ordered 2 more stamps to complement this one, for the saddlebag connecting strap and front of the bag. I hope to complete a full set of saddlebags very soon…

I used TinkerCad to make the 3D models from an outline graphic – www.tinkercad.com

And Hubs to source a 3D printer close to me – www.hubs.com

Another finished saddle, or two!

Took a quick holiday because the opportunity arose! But managed to get my latest saddle finished, a lovely chocolate brown number AND my Al Stohlman saddle too, so they have to be photographed for the website! Fortunately I have a great room which gets really good natural light. It does change day to day but Photoshop can usually help fix most things. I use a simple compact camera set on automatic and a Gorillapod for stability, a roll of white craft paper and Bob’s your uncle! So I took a few quick shots but need to take a better set now, watch this space. Then its on to the next one, if I can squeeze it in around the gardening of course.

3D printing

So I’ve started experimenting with ways to produce bits for bridles and other hardware. It’s opened up a whole new world of 3D modelling and printing, and its not as hard as you would think, although results are coming out a bit mixed.

For these first prototypes I used some of my design software, Adobe Illustrator, to produce the outlines of the bits I wanted – there are other cheap/free vector packages out there. Then I used TinkerCad to make them into 3D models and sent them off to be printed. Yep! It was that easy and pretty inexpensive, under £15 a set. The first prototypes were slightly too large for me, despite checking with paper templates first. The second set were smaller but pushing the boundaries of how small you can go on some of the styles. And I quickly found out that a lot of finishing would be required. We are in the realms of acetone baths (didn’t really work for me!), lots of fine sanding and lots of chrome spray layers to get them looking halfway decent. SO… something I am still working on. I have lots of pieces to continue the experiments, but I’m also looking into other processes.

There are many different styles of bits out there for bridles, in the real world. Quite a few of these have been reproduced for the classic and traditional scales, not so many for one sixth scale. Rio Rondo carry a few bits for us, and their other lovely tack items can work across the sizes, which is great. However, its a bit of a pain to get things posted across here to Blighty! A rather long drawn out and expensive business – and lets not even talk about the infamous Royal Mail ‘handling charges’…